If you’ve ever sent a flyer, business card, postcard, brochure, or presentation folder to print, you may have heard the terms bleed, trim, and safety margin. They sound small, but they can make a big difference in how polished your finished piece looks.
Understanding bleed trim and safety margins in printing helps prevent awkward white edges, cut-off text, uneven borders, and last-minute file delays. For small business owners, office managers, and marketing teams, these details can save time and reduce confusion during the proofing process.
You don’t need to become a print production expert. But knowing the basics will help you prepare cleaner files, communicate better with your print shop, and avoid preventable issues before your project reaches production.
What are bleed, trim, and safety margins?
Most printed pieces are produced on larger sheets and then cut down to their final size. Because trimming involves physical equipment, there can be tiny variations from piece to piece. Bleed, trim, and safety margins are built into your artwork to account for those normal production realities.
Bleed
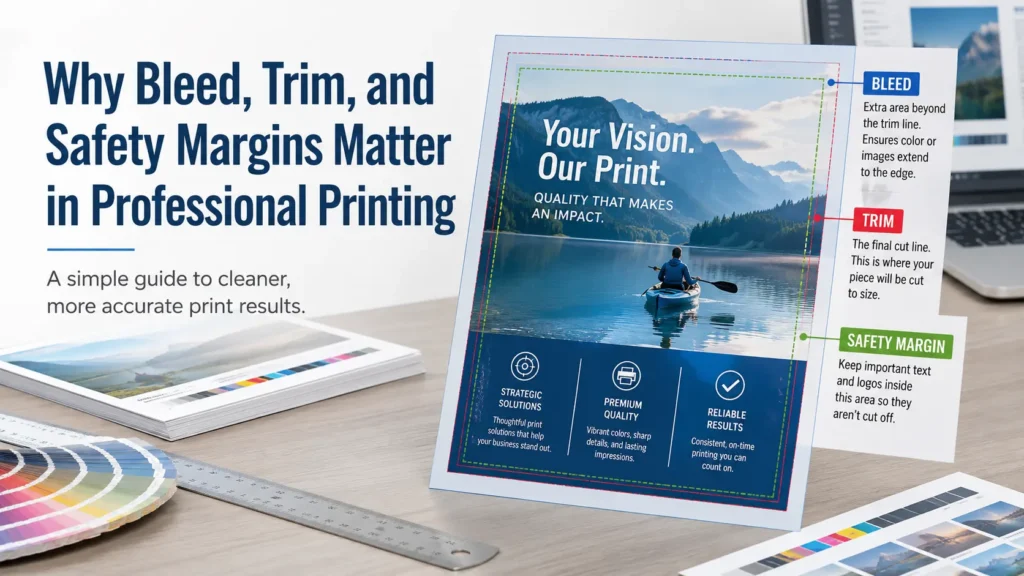
Bleed is the extra artwork that extends beyond the final cut edge of your printed piece. If your background color, photo, pattern, or design element is supposed to run all the way to the edge, it needs to extend past the trim line.
Without bleed, even a very small shift during trimming can leave a thin white line along the edge. That line is especially noticeable on dark backgrounds, full-color flyers, postcards, menus, and business cards.
A common bleed amount is 1/8 inch, but requirements can vary by product, equipment, material, and finishing method. Always confirm the correct bleed size with your print shop before final production. Premier Printing Services also provides file preparation guidance through the Premier Pre-Press ToolKit.
Trim
The trim line is where the printed piece is intended to be cut to its final size. For example, if you order a standard business card, the trim size is the final card size after cutting.
The trim line is not usually printed on the finished piece. It’s a production guide that tells the printer where the final edge should be. Designers often use crop marks or export settings to show the trim area in a print-ready PDF.
Safety margin
The safety margin is the area inside the trim line where important content should stay. This includes text, logos, phone numbers, QR codes, addresses, disclaimers, and any design element that must not be cut off.
If content sits too close to the trim edge, it may look cramped or risk being clipped during finishing. A safety margin gives your content breathing room and helps the final piece look intentional.
Why bleed trim and safety margins in printing matter
Print production is precise, but it’s still a physical process. Paper moves through equipment. Sheets are stacked, cut, folded, scored, bound, or finished. Small tolerances are normal, especially on projects with multiple finishing steps.
Bleed, trim, and safety margins help protect the design from those small shifts. They’re not just technical preferences. They’re practical safeguards that help the finished product match the intent of the artwork.
For marketing teams, this matters because printed materials often represent a brand in front of customers, donors, employees, or event attendees. A postcard with a sliver of white on one edge or a brochure with text too close to the fold can make a good design feel rushed.
For office managers, these details matter because file problems can slow down approvals. If a print shop has to pause production to request corrected artwork, that may affect your schedule. If you’re managing a deadline, use a planning resource like the print deadline checklist for artwork, copy, and approvals to build in time for review.
Common file setup mistakes that cause print issues
Most bleed and margin problems are easy to miss on screen. A PDF can look fine at first glance, but still create production concerns once it’s checked for print.
- No bleed on edge-to-edge artwork: Background colors or photos stop at the final size instead of extending past it.
- Text too close to the edge: Phone numbers, web addresses, disclaimers, or headlines sit near the trim line.
- Thin borders near the trim: A narrow border can look uneven after cutting, even if the trim is within normal tolerance.
- Incorrect document size: The artwork is built at a random size and then scaled, which can affect layout and image quality.
- Low-resolution images: Photos that look acceptable on screen may print soft or pixelated. If you’re unsure, review what makes a logo or photo suitable for high-quality print production.
- Important content near folds or drill holes: Brochures, folders, booklets, tags, and bound pieces may need extra clearance around finishing areas.
Business cards are a common place where these issues show up because the format is small and every fraction of an inch feels noticeable. If you’re preparing cards, the business card printing mistakes to avoid guide can help you catch layout problems early.
How bleed and margins change by product
The basic idea is the same across most print projects, but the best setup can vary depending on what you’re ordering. A flat flyer is different from a folded brochure. A banner is different from a booklet. A postcard for mailing may have areas that need to stay clear for addressing, postage, or postal markings.
For flyer printing, bleed is often important when the design has a full-color background or image that reaches the edge. For business card printing, safety margins help keep names, titles, and contact information from feeling crowded. For banner printing, placement may need to account for hems, grommets, viewing distance, and installation conditions.
Paper choice and finishing can also affect file planning. Heavier stocks, folding, scoring, die cutting, lamination, and specialty finishes may require additional setup considerations. If you’re still deciding on stock, this guide to choosing the right paper for printing is a helpful starting point.
File setup tips before you request a quote
Before asking for a quote or sending files to production, it helps to check a few basics. You don’t have to solve every technical detail yourself, but the more complete your file is, the smoother the review process usually goes.
- Confirm the final trim size of the piece.
- Add bleed if artwork is intended to run to the edge.
- Keep important text, logos, and QR codes inside the recommended safety area.
- Use high-quality images and vector logos when available.
- Export a print-ready PDF when possible.
- Include crop marks only if requested or appropriate for the project.
- Review folding, mailing, binding, or finishing requirements before finalizing artwork.
- Ask for a file check if you’re not sure the artwork is production-ready.
Color settings, image resolution, file format, and proofing can also affect the final result. Since requirements vary by job, it’s best to confirm with your printer before production. If your team often runs into file questions, Premier’s prepress and graphic design services can help with setup, corrections, and production guidance.
Timeline expectations: build in time for file review
Bleed and margin issues often come up during prepress review. If your project has a firm event date, mailing date, meeting date, or campaign launch, don’t wait until the last moment to send artwork.
Even simple changes can take time if multiple people need to approve the file. A designer may need to adjust the layout, a manager may need to review a new proof, or a department head may need to approve revised copy. That back-and-forth can add pressure if the deadline is already tight.
A good habit is to separate the design deadline from the print deadline. Give your team time to review content, confirm specs, check spelling, approve proofs, and resolve file concerns before production is expected to begin.
When should you ask for help?
Ask for help before production if you’re unsure about bleed, margins, image quality, fold placement, mailing layout, or finishing requirements. It’s much easier to fix a file before printing than to discover a problem after the job is produced.
You should also ask for guidance if your design was created in a platform that isn’t primarily built for print production, if you’re resizing artwork from one format to another, or if several versions need to stay consistent across departments or locations.
For larger programs, such as recurring business materials, multi-location campaigns, or corporate print needs, consistency becomes even more important. Premier supports a range of business printing and corporate printing projects where file preparation, proofing, and repeat ordering need to be handled carefully.
FAQ about bleed, trim, and safety margins
Can I print a file without bleed?
Sometimes, yes. If your design has a white background and no artwork runs to the edge, bleed may not be needed. If color, images, or graphics touch the edge, bleed is usually recommended. Confirm the correct setup with the print shop before production.
How much bleed should I add?
A common bleed amount is 1/8 inch, but it can vary depending on the product, equipment, and finishing. Always check the requested specifications for your specific project.
What happens if text is outside the safety margin?
Text near the trim edge may be cut off or look too close to the edge after finishing. Moving important content inward helps protect readability and gives the layout a cleaner appearance.
Are crop marks the same as bleed?
No. Crop marks show where the piece should be trimmed. Bleed is the extra artwork that extends beyond the trim line. A file can have crop marks and still be missing bleed.
Can Premier Printing Services fix my file?
In many cases, file issues can be reviewed and corrected before production, depending on the file type and what needs to be changed. It’s best to send the artwork early so the team can review it and explain any options.
Final thoughts on bleed trim and safety margins in printing
Bleed, trim, and safety margins may seem like small setup details, but they play a big role in professional print quality. They help your finished pieces look clean, protect important content, and reduce avoidable file delays.
If you’re preparing artwork for a flyer, business card, brochure, postcard, banner, mailer, or corporate print project, it’s worth checking these details before you submit the file. A short file review upfront can prevent a lot of stress later.
Need help checking a file or planning an upcoming print project? Contact Premier Printing Services for more information or project help.