Every print project has a moment when the deadline suddenly feels closer than it did yesterday. Maybe the brochure is needed for a sales meeting, the flyers are tied to an event date, or the office manager is trying to reorder forms before supplies run out. A good print deadline checklist helps keep the project moving before small details turn into production delays.
The goal isn’t to make the process complicated. It’s to get the right artwork, copy, specifications, and approvals in place early enough that your print shop can review the job, prepare an accurate quote, and flag any issues before production begins.
Whether you’re ordering business cards, flyers, direct mail pieces, banners, booklets, envelopes, or branded materials for multiple locations, the same basic planning steps apply. Here’s how to organize your project before the deadline pressure hits.
Start with the final delivery date
Before you gather files or request a quote, write down the date the printed materials need to be in hand. This is not always the same as the event date or mailing date. If your team needs time to sort, distribute, pack, install, or mail the materials, build that into your schedule.
Work backward from that date and note any fixed milestones. Examples include an event setup day, a mail drop date, a board meeting, a sales presentation, a trade show shipment, or an internal approval meeting.
If your project has mailing, variable data, installation, specialty finishing, or multiple versions, ask your print provider what they need before production can begin. Turnaround can vary by product, quantity, finishing, materials, proofing needs, and shop schedule, so it’s best to confirm timing before making promises to your team.
Build a print deadline checklist before files are due
A simple print deadline checklist gives everyone one place to track what’s ready and what’s still missing. It doesn’t need to be fancy. A shared document or project management task list can work well.
At minimum, include these items:
- Project name and main contact
- Final in-hand date
- Quantity needed
- Finished size and folded size, if applicable
- Paper or material preference
- Color requirements
- Finishing needs such as folding, binding, coating, scoring, drilling, or numbering
- Delivery, pickup, mailing, or distribution details
- Final copy status
- Final artwork status
- Approver names and approval deadline
- Proof review status
If you’re not sure about sizes, stocks, or finishing options, that’s normal. A print shop can help you compare practical options. For a helpful overview of stock choices, see this guide to paper choice for printing.
Organize copy before design starts
Copy delays are one of the most common reasons print projects stall. A designer can build a beautiful layout, but if the text keeps changing, the file may need repeated revisions and approvals.
Before artwork is finalized, collect the written content in one clean document. Include headlines, body copy, disclaimers, contact details, addresses, website URLs, QR code destinations, offer dates, coupon codes, legal language, and any required partner or sponsor information.
For marketing teams, it helps to separate copy approval from design approval. First approve the words, then approve the layout. This reduces the chance that someone rewrites a paragraph after the file has already been prepared for print.
Check the small details
Small errors can be expensive if they’re caught late. Confirm phone numbers, email addresses, names, titles, dates, prices, hours, room numbers, and URLs. If the piece includes a QR code, test it on more than one phone before approving the proof.
For forms, menus, schedules, and event materials, make sure the latest version is being used. Old content often gets copied into new designs by accident.
Collect artwork and brand files early
Artwork issues can take time to fix, especially when original files are missing. Gather logos, photos, brand guidelines, fonts if applicable, previous print files, and any required icons or graphics as early as possible.
High-quality printing depends on the quality of the source files. A small logo pulled from a website may look fine on screen but print poorly when enlarged. If you’re unsure whether a logo or photo is suitable, review this article on what makes a logo or photo suitable for print production.
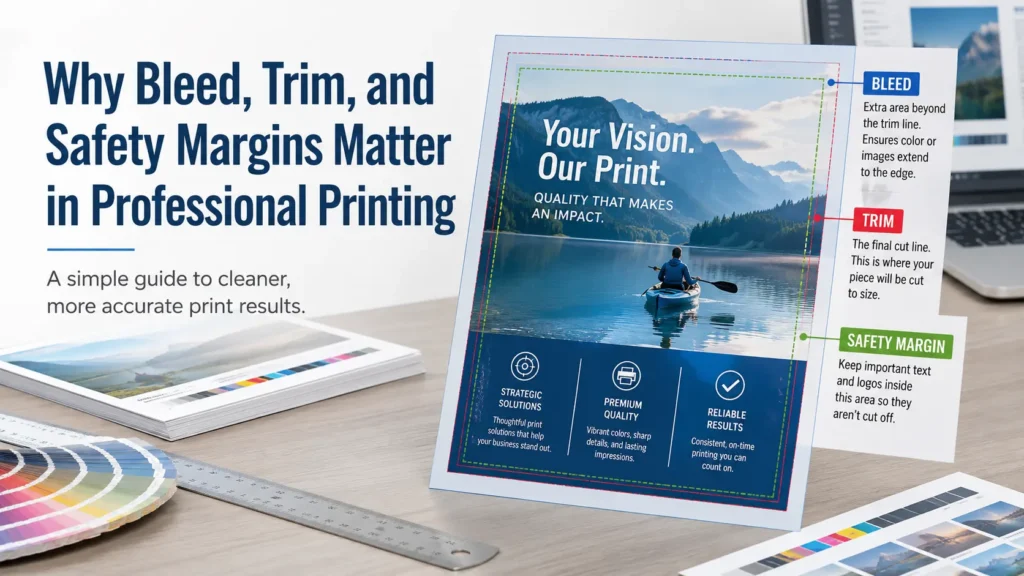
When preparing artwork files for printing, pay attention to bleed, trim, safety margins, resolution, color mode, font handling, and image links. Requirements can vary by product and equipment, so confirm specs with your print shop before production. Premier Printing Services also provides a Prepress Toolkit to help customers understand common file setup needs.
Name files clearly
Clear file names prevent confusion. Avoid names like final.pdf, final-final.pdf, or updated-new-final.pdf. Instead, use a consistent format such as company-project-size-version-date.pdf.
If there are multiple versions, such as different locations, languages, departments, or offers, label them clearly. Include a version list so the printer knows exactly how many versions exist and what quantity is needed for each.
Confirm print specs before requesting a quote
A print quote is only as accurate as the information provided. If the size, quantity, paper, finishing, or delivery details change later, the quote may need to be revised.
Before requesting pricing, gather the basics:
- Product type, such as flyer, booklet, postcard, banner, envelope, or business card
- Finished size
- Flat size and folded size, if folded
- Page count for booklets or catalogs
- Quantity
- Paper stock or material preference
- Ink or color needs
- One-sided or two-sided printing
- Finishing, binding, coating, scoring, perforation, or drilling needs
- Mailing, shipping, pickup, or delivery requirements
If you’re not sure what to choose, describe how the piece will be used. A flyer handed out at an event may need different considerations than a direct mail postcard or a booklet for a board meeting. You can also start with the Request A Quote page if you already have project details ready.
For broader recurring needs, small businesses can review business printing services, while larger teams may find corporate printing services useful for ongoing materials and multi-department coordination.
Set up a simple print project approval process
The approval process should be clear before anyone sends files to print. Decide who has final authority, who only needs to review, and when comments are due.
Too many approvers can slow a project down. If five people give separate edits at different times, the file may go through multiple unnecessary revision rounds. It’s usually better to collect feedback internally, resolve conflicts, and send one consolidated list of changes.
For office managers and marketing coordinators, it helps to ask approvers specific questions. Instead of saying, Please review, ask them to confirm spelling, offer details, brand accuracy, contact information, compliance language, and final approval to print.
Use approval language that’s clear
When a proof is approved, the printer needs to know that the file is ready for production. Avoid vague replies like looks good to me if other people still need to review it.
A clearer response is: Approved for print, no further changes. If changes are needed, list them in a numbered format and confirm whether you need another proof before production.
Review proofs carefully before production
A proof is your opportunity to catch issues before the job is produced. Depending on the project, a proof may be digital or physical. Ask your print shop what type of proof is appropriate for your job.
During proof review, check content first. Then review layout, page order, folds, margins, image placement, color expectations, and version details. If the piece has bleeds, crops, special folds, mailing panels, or variable information, review those areas closely.
Proofs are not the best time to rethink the entire concept. Major design or copy changes at proof stage can affect the schedule, especially close to a deadline. For more planning guidance, see how to plan print campaigns without last-minute file issues.
Common mistakes that slow down print projects
Most print delays come from a few repeat problems. Here are the ones to watch for before your deadline:
- Submitting low-resolution logos or images
- Sending files without bleed when bleed is required
- Placing important text too close to the trim edge
- Using outdated copy or old brand assets
- Changing quantity or specs after the quote is approved
- Not identifying all versions of a file
- Waiting too long for internal approvals
- Approving a proof before checking contact details and dates
- Forgetting mailing, delivery, or distribution requirements
If you’re unfamiliar with bleed, trim, and safety areas, this guide to bleed, trim, and safety margins in printing is a useful place to start. You can also use the Prepress Toolkit for file setup basics before sending artwork.
When to ask your print shop for help
You don’t have to solve every file or production question on your own. It’s better to ask early than to find out near the deadline that a file needs rebuilding or a stock choice won’t work well for the project.
Ask for help if you’re missing original design files, unsure about image quality, choosing between paper stocks, planning a complex fold, preparing direct mail, managing multiple versions, or coordinating materials for several locations.
If your team needs design cleanup, file preparation, or production guidance, Premier Printing Services offers prepress and graphic design services. For teams that order frequently, a request portal may also help organize repeat projects and reduce back-and-forth.
FAQ: Organizing print files before a deadline
How early should I contact a printer before my deadline?
Contact the print shop as soon as you know the project details or deadline. Timing depends on the product, quantity, finishing, proofing, materials, and current production schedule, so confirm directly before planning around a specific date.
What files should I send for a print quote?
If available, send a print-ready PDF along with project specs such as size, quantity, paper preference, finishing, and delivery or mailing details. If the file is still in progress, send what you have and explain what may change.
Can my printer fix artwork issues?
Often, yes, depending on the issue and the files provided. Some fixes are simple, while others require design time or new source files. Ask your print shop to review the artwork before production.
Who should approve the final proof?
The final approver should be someone authorized to approve content, branding, specs, and production. If several people need input, collect their comments before sending one final approval.
Conclusion: Use a print deadline checklist to reduce last-minute stress
A print deadline checklist gives your team a practical way to organize copy, artwork, specs, and approvals before files reach production. It also helps your print provider give better guidance, spot possible file issues, and prepare an accurate quote.
The best time to ask questions is before the deadline is tight. If you’re planning an upcoming print project and want help reviewing files, specs, timing, or production options, contact Premier Printing Services for more information or project help.